Skip to content

Streaming ETL pipeline

What is it?

A streaming ETL pipeline, sometimes called a “streaming data pipeline”, is a set of software services that ingests events, transforms them, and loads them into destination storage systems. It’s often the case that you have data in one place and want to move it to another as soon as you receive it, but you need to make some changes to the data as you transfer it.

Maybe you need to do something simple, like transform the events to strip out any personally identifiable information. Sometimes, you may need to do something more complex, like enrich the events by joining them with data from another system. Or perhaps you want to pre-aggregate the events to reduce how much data you send to the downstream systems.

A streaming ETL pipeline enables streaming events between arbitrary sources and sinks, and it helps you make changes to the data while it’s in-flight.

hard

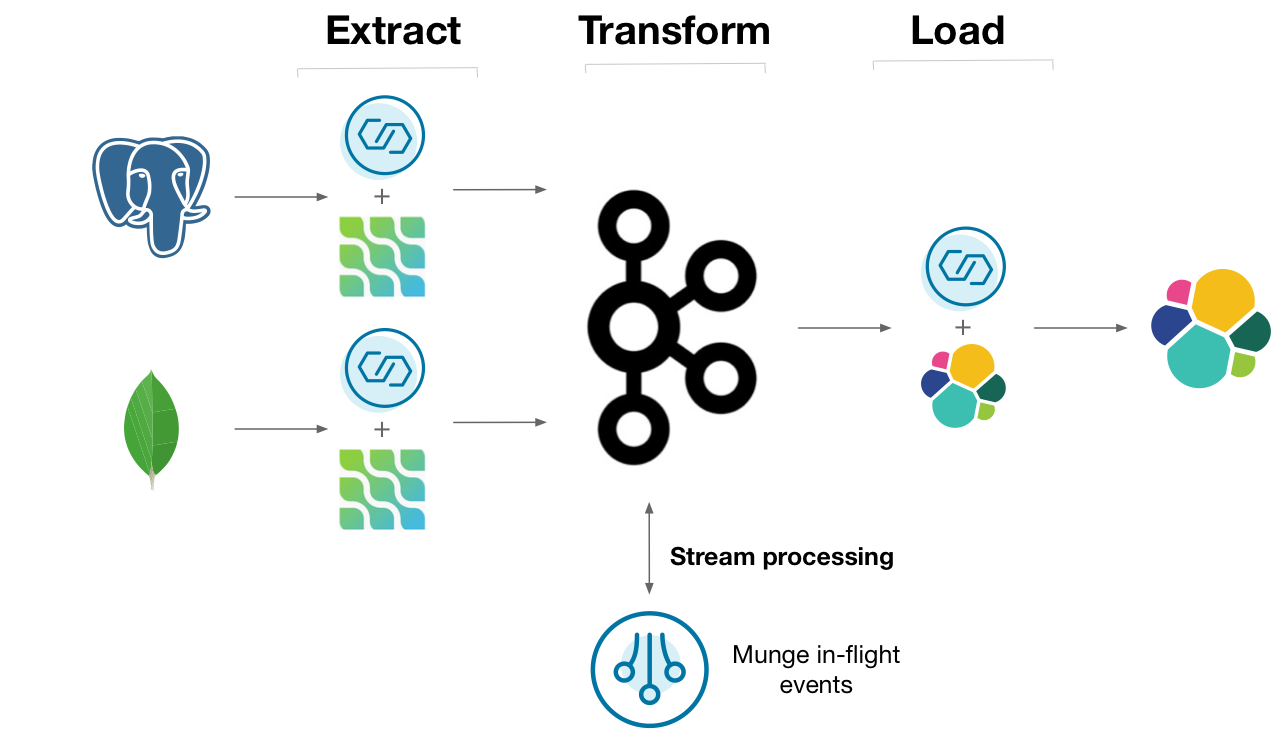
One way you might do this is to capture the changelogs of upstream Postgres and MongoDB databases using the Debezium Kafka connectors. The changelog can be stored in Kafka, where a series of deployed programs transforms, aggregates, and joins the data together. The processed data can be streamed out to ElasticSearch for indexing. Many people build this sort of architecture, but could it be made simpler?

Why ksqlDB?

Gluing all of the above services together is certainly a challenge. Along with your original databases and target analytical data store, you end up managing clusters for Kafka, connectors, and your stream processors. It's challenging to operate the entire stack as one.

ksqlDB helps streamline how you write and deploy streaming data pipelines by boiling it down to just two things: storage (Kafka) and compute (ksqlDB).

easy

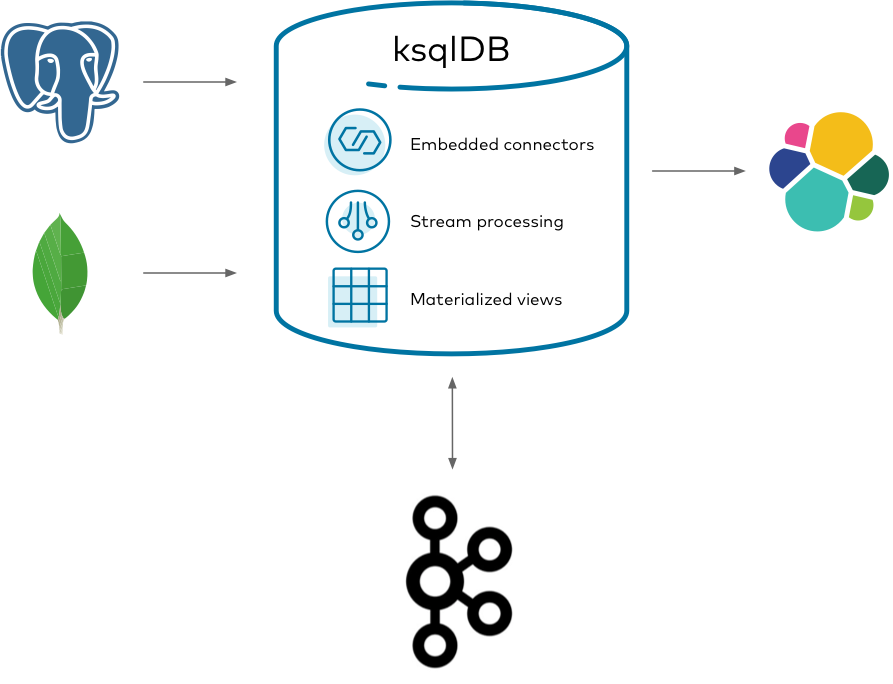
Using ksqlDB, you can run any Kafka Connect connector by embedding it in ksqlDB's servers. You can transform, join, and aggregate all of your streams together by using a coherent, powerful SQL language. This gives you a slender architecture for managing the end-to-end flow of your data pipeline.

Implement it

Suppose you work at a retail company that sells and ships orders to online customers. You want to analyze the shipment activity of orders as they happen in real-time. Because the company is somewhat large, the data for customers, orders, and shipments are spread across different databases and tables.

This tutorial shows how to create a streaming ETL pipeline that ingests and joins events together to create a cohesive view of orders that shipped. It demonstrates capturing changes from Postgres and MongoDB databases, forwarding them into Kafka, joining them together with ksqlDB, and sinking them out to ElasticSearch for analytics.

Get the connectors

To get started, download the connectors for Postgres, MongoDB, and Elasticsearch to a fresh directory. The easiest way to do this is by using confluent-hub.

Create a directory for your components:

1
mkdir confluent-hub-components

First, acquire the Postgres Debezium connector:

1
confluent-hub install --component-dir confluent-hub-components --no-prompt debezium/debezium-connector-postgresql:1.1.0

Likewise for the MongoDB Debezium connector:

1
confluent-hub install --component-dir confluent-hub-components --no-prompt debezium/debezium-connector-mongodb:1.1.0

And finally, the Elasticsearch connector:

1
confluent-hub install --component-dir confluent-hub-components --no-prompt confluentinc/kafka-connect-elasticsearch:10.0.1

Start the stack

Next, set up and launch the services in the stack. But before you bring it up, you need to make a few changes to the way that Postgres launches so that it works well with Debezium. Debezium has dedicated documentation on this if you're interested, but this guide covers just the essentials. To simplify some of this, you launch a Postgres Docker container extended by Debezium to handle some of the customization. Also, you must create an additional configuration file at postgres/custom-config.conf with the following content:

1
2
3
4
listen_addresses = '*'
wal_level = 'logical'
max_wal_senders = 1
max_replication_slots = 1

This sets up Postgres so that Debezium can watch for changes as they occur.

With the Postgres configuration file in place, create a docker-compose.yml file that defines the services to launch. You may need to increase the amount of memory that you give to Docker when you launch it:

  1
  2
  3
  4
  5
  6
  7
  8
  9
 10
 11
 12
 13
 14
 15
 16
 17
 18
 19
 20
 21
 22
 23
 24
 25
 26
 27
 28
 29
 30
 31
 32
 33
 34
 35
 36
 37
 38
 39
 40
 41
 42
 43
 44
 45
 46
 47
 48
 49
 50
 51
 52
 53
 54
 55
 56
 57
 58
 59
 60
 61
 62
 63
 64
 65
 66
 67
 68
 69
 70
 71
 72
 73
 74
 75
 76
 77
 78
 79
 80
 81
 82
 83
 84
 85
 86
 87
 88
 89
 90
 91
 92
 93
 94
 95
 96
 97
 98
 99
100
101
102
103
104
105
106
107
108
109
110
111
112
113
114
115
116
117
118
119
---
version: '2'

services:
  mongo:
    image: mongo:4.2.5
    hostname: mongo
    container_name: mongo
    ports:
      - "27017:27017"
    environment:
      MONGO_INITDB_ROOT_USERNAME: mongo-user
      MONGO_INITDB_ROOT_PASSWORD: mongo-pw
      MONGO_REPLICA_SET_NAME: my-replica-set
    command: --replSet my-replica-set --bind_ip_all

  postgres:
    image: debezium/postgres:12
    hostname: postgres
    container_name: postgres
    ports:
      - "5432:5432"
    environment:
      POSTGRES_USER: postgres-user
      POSTGRES_PASSWORD: postgres-pw
      POSTGRES_DB: customers
    volumes:
      - ./postgres/custom-config.conf:/etc/postgresql/postgresql.conf
    command: postgres -c config_file=/etc/postgresql/postgresql.conf

  elastic:
    image: elasticsearch:7.6.2
    hostname: elastic
    container_name: elastic
    ports:
      - "9200:9200"
      - "9300:9300"
    environment:
      discovery.type: single-node

  zookeeper:
    image: confluentinc/cp-zookeeper:7.0.0
    hostname: zookeeper
    container_name: zookeeper
    ports:
      - "2181:2181"
    environment:
      ZOOKEEPER_CLIENT_PORT: 2181
      ZOOKEEPER_TICK_TIME: 2000

  broker:
    image: confluentinc/cp-kafka:7.0.0
    hostname: broker
    container_name: broker
    depends_on:
      - zookeeper
    ports:
      - "29092:29092"
    environment:
      KAFKA_BROKER_ID: 1
      KAFKA_ZOOKEEPER_CONNECT: 'zookeeper:2181'
      KAFKA_LISTENER_SECURITY_PROTOCOL_MAP: PLAINTEXT:PLAINTEXT,PLAINTEXT_HOST:PLAINTEXT
      KAFKA_ADVERTISED_LISTENERS: PLAINTEXT://broker:9092,PLAINTEXT_HOST://localhost:29092
      KAFKA_OFFSETS_TOPIC_REPLICATION_FACTOR: 1
      KAFKA_GROUP_INITIAL_REBALANCE_DELAY_MS: 0
      KAFKA_TRANSACTION_STATE_LOG_MIN_ISR: 1
      KAFKA_TRANSACTION_STATE_LOG_REPLICATION_FACTOR: 1

  schema-registry:
    image: confluentinc/cp-schema-registry:7.0.0
    hostname: schema-registry
    container_name: schema-registry
    depends_on:
      - zookeeper
      - broker
    ports:
      - "8081:8081"
    environment:
      SCHEMA_REGISTRY_HOST_NAME: schema-registry
      SCHEMA_REGISTRY_KAFKASTORE_BOOTSTRAP_SERVERS: "PLAINTEXT://broker:9092"

  ksqldb-server:
    image: confluentinc/ksqldb-server:0.23.1
    hostname: ksqldb-server
    container_name: ksqldb-server
    depends_on:
      - broker
      - schema-registry
    ports:
      - "8088:8088"
    volumes:
      - "./confluent-hub-components/:/usr/share/kafka/plugins/"
    environment:
      KSQL_LISTENERS: "http://0.0.0.0:8088"
      KSQL_BOOTSTRAP_SERVERS: "broker:9092"
      KSQL_KSQL_SCHEMA_REGISTRY_URL: "http://schema-registry:8081"
      KSQL_KSQL_LOGGING_PROCESSING_STREAM_AUTO_CREATE: "true"
      KSQL_KSQL_LOGGING_PROCESSING_TOPIC_AUTO_CREATE: "true"
      KSQL_CONNECT_GROUP_ID: "ksql-connect-cluster"
      KSQL_CONNECT_BOOTSTRAP_SERVERS: "broker:9092"
      KSQL_CONNECT_KEY_CONVERTER: "org.apache.kafka.connect.storage.StringConverter"
      KSQL_CONNECT_VALUE_CONVERTER: "io.confluent.connect.avro.AvroConverter"
      KSQL_CONNECT_VALUE_CONVERTER_SCHEMA_REGISTRY_URL: "http://schema-registry:8081"
      KSQL_CONNECT_CONFIG_STORAGE_TOPIC: "_ksql-connect-configs"
      KSQL_CONNECT_OFFSET_STORAGE_TOPIC: "_ksql-connect-offsets"
      KSQL_CONNECT_STATUS_STORAGE_TOPIC: "_ksql-connect-statuses"
      KSQL_CONNECT_CONFIG_STORAGE_REPLICATION_FACTOR: 1
      KSQL_CONNECT_OFFSET_STORAGE_REPLICATION_FACTOR: 1
      KSQL_CONNECT_STATUS_STORAGE_REPLICATION_FACTOR: 1
      KSQL_CONNECT_PLUGIN_PATH: "/usr/share/kafka/plugins"

  ksqldb-cli:
    image: confluentinc/ksqldb-cli:0.23.1
    container_name: ksqldb-cli
    depends_on:
      - broker
      - ksqldb-server
    entrypoint: /bin/sh
    tty: true

There are a couple things to notice here. The Postgres image mounts the custom configuration file that you wrote. Postgres adds these configuration settings into its system-wide configuration. The environment variables you gave it also set up a blank database called customers, along with a user named postgres-user that can access it.

The compose file also sets up MongoDB as a replica set named my-replica-set. Debezium requires that MongoDB runs in this configuration to pick up changes from its oplog (see Debezium's documentation on MongoDB). In this case, you're just running a single-node replica set.

Finally, note that the ksqlDB server image mounts the confluent-hub-components directory, too. The jar files that you downloaded need to be on the classpath of ksqlDB when the server starts up.

Bring up the entire stack by running:

1
docker-compose up

Create the customers table in Postgres

It's pretty common for companies to keep their customer data in a relational database. You can model this information in a Postgres table. Start by logging into the container:

1
docker exec -it postgres /bin/bash

Log into Postgres as the user created by default:

1
psql -U postgres-user customers

Create a table that represents the customers. For simplicity, model a customer with three columns: an id, a name, and the age of the person:

1
CREATE TABLE customers (id TEXT PRIMARY KEY, name TEXT, age INT);

Seed the table with some initial data:

1
2
3
INSERT INTO customers (id, name, age) VALUES ('5', 'fred', 34);
INSERT INTO customers (id, name, age) VALUES ('7', 'sue', 25);
INSERT INTO customers (id, name, age) VALUES ('2', 'bill', 51);

Configure MongoDB for Debezium

Now that Postgres is setup, you can configure MongoDB. Start by logging into the container:

1
docker exec -it mongo /bin/bash

Log into the Mongo console using the username specified in the Docker Compose file:

1
mongo -u $MONGO_INITDB_ROOT_USERNAME -p mongo-pw admin

Because MongoDB has been started as a replica set, it needs to be initiated. Run the following command to kick it off:

1
rs.initiate()

Now that this node has become the primary in the replica set, you need to configure access so that Debezium can replicate changes remotely. Switch into the config database:

1
use config

Create a new role for Debezium. This role enables the user that you will create to access system-level collections, which are normally restricted:

 1
 2
 3
 4
 5
 6
 7
 8
 9
10
11
12
13
14
db.createRole({
    role: "dbz-role",
    privileges: [
        {
            resource: { db: "config", collection: "system.sessions" },
            actions: [ "find", "update", "insert", "remove" ]
        }
    ],
    roles: [
       { role: "dbOwner", db: "config" },
       { role: "dbAdmin", db: "config" },
       { role: "readWrite", db: "config" }
    ]
})

Switch into the admin database and create the user here so that it can be authenticated:

1
use admin

Create the user for Debezium. This user has root on the admin database, and can also access other databases needed for replication:

 1
 2
 3
 4
 5
 6
 7
 8
 9
10
11
12
13
14
15
16
17
18
db.createUser({
  "user" : "dbz-user",
  "pwd": "dbz-pw",
  "roles" : [
    {
      "role" : "root",
      "db" : "admin"
    },
    {
      "role" : "readWrite",
      "db" : "logistics"
    },
    {
      "role" : "dbz-role",
      "db" : "config"
    }
  ]
})

Create the logistics collections in MongoDB

With the user created, you can create the database for orders and shipments, which are stored as collections in a database called logistics:

1
use logistics

First create the orders:

1
db.createCollection("orders")

And likewise the shipments:

1
db.createCollection("shipments")

Populate the orders collection with some initial data. Notice that the customer_id references identifiers that you created in your Postgres customers table:

1
2
3
4
5
db.orders.insert({"customer_id": "2", "order_id": "13", "price": 50.50, "currency": "usd", "ts": "2020-04-03T11:20:00"})
db.orders.insert({"customer_id": "7", "order_id": "29", "price": 15.00, "currency": "aud", "ts": "2020-04-02T12:36:00"})
db.orders.insert({"customer_id": "5", "order_id": "17", "price": 25.25, "currency": "eur", "ts": "2020-04-02T17:22:00"})
db.orders.insert({"customer_id": "5", "order_id": "15", "price": 13.75, "currency": "usd", "ts": "2020-04-03T02:55:00"})
db.orders.insert({"customer_id": "7", "order_id": "22", "price": 29.71, "currency": "aud", "ts": "2020-04-04T00:12:00"})

Do the same for shipments. Notice that the order_id references order ids you created in the previous collection.

1
2
3
4
5
db.shipments.insert({"order_id": "17", "shipment_id": "75", "origin": "texas", "ts": "2020-04-04T19:20:00"})
db.shipments.insert({"order_id": "22", "shipment_id": "71", "origin": "iowa", "ts": "2020-04-04T12:25:00"})
db.shipments.insert({"order_id": "29", "shipment_id": "89", "origin": "california", "ts": "2020-04-05T13:21:00"})
db.shipments.insert({"order_id": "13", "shipment_id": "92", "origin": "maine", "ts": "2020-04-04T06:13:00"})
db.shipments.insert({"order_id": "15", "shipment_id": "95", "origin": "florida", "ts": "2020-04-04T01:13:00"})

Start the Postgres and MongoDB Debezium source connectors

With all of the seed data in place, you can process it with ksqlDB. Connect to ksqlDB's server by using its interactive CLI. Run the following command from your host:

1
docker exec -it ksqldb-cli ksql http://ksqldb-server:8088

Before you issue more commands, tell ksqlDB to start all queries from earliest point in each topic:

1
SET 'auto.offset.reset' = 'earliest';

Now you can ask Debezium to stream the Postgres changelog into Kafka. Invoke the following command in ksqlDB, which creates a Debezium source connector and writes all of its changes to Kafka topics:

 1
 2
 3
 4
 5
 6
 7
 8
 9
10
11
12
13
14
CREATE SOURCE CONNECTOR customers_reader WITH (
    'connector.class' = 'io.debezium.connector.postgresql.PostgresConnector',
    'database.hostname' = 'postgres',
    'database.port' = '5432',
    'database.user' = 'postgres-user',
    'database.password' = 'postgres-pw',
    'database.dbname' = 'customers',
    'database.server.name' = 'customers',
    'table.whitelist' = 'public.customers',
    'transforms' = 'unwrap',
    'transforms.unwrap.type' = 'io.debezium.transforms.ExtractNewRecordState',
    'transforms.unwrap.drop.tombstones' = 'false',
    'transforms.unwrap.delete.handling.mode' = 'rewrite'
);

Notice that this statement specifies an unwrap transform. By default, Debezium sends all events in an envelope that includes many pieces of information about the change captured. For this tutorial, the app only uses the value after it changed, so the command tells Kafka Connect to keep this information and discard the rest.

Run another source connector to ingest the changes from MongoDB. Specify the same behavior for discarding the Debezium envelope:

 1
 2
 3
 4
 5
 6
 7
 8
 9
10
11
12
13
14
CREATE SOURCE CONNECTOR logistics_reader WITH (
    'connector.class' = 'io.debezium.connector.mongodb.MongoDbConnector',
    'mongodb.hosts' = 'mongo:27017',
    'mongodb.name' = 'my-replica-set',
    'mongodb.authsource' = 'admin',
    'mongodb.user' = 'dbz-user',
    'mongodb.password' = 'dbz-pw',
    'collection.whitelist' = 'logistics.*',
    'transforms' = 'unwrap',
    'transforms.unwrap.type' = 'io.debezium.connector.mongodb.transforms.ExtractNewDocumentState',
    'transforms.unwrap.drop.tombstones' = 'false',
    'transforms.unwrap.delete.handling.mode' = 'drop',
    'transforms.unwrap.operation.header' = 'true'
);

Create the ksqlDB source streams

For ksqlDB to be able to use the topics that Debezium created, you must declare streams over it. Because you configured Kafka Connect with Schema Registry, you don't need to declare the schema of the data for the streams, because it's inferred from the schema that Debezium writes with.

Run the following statement to create a stream over the customers table:

1
2
3
4
CREATE STREAM customers WITH (
    kafka_topic = 'customers.public.customers',
    value_format = 'avro'
);

Do the same for orders. For this stream, specify that the timestamp of the event is derived from the data itself. Specifically, it's extracted and parsed from the ts field.

1
2
3
4
5
6
CREATE STREAM orders WITH (
    kafka_topic = 'my-replica-set.logistics.orders',
    value_format = 'avro',
    timestamp = 'ts',
    timestamp_format = 'yyyy-MM-dd''T''HH:mm:ss'
);

Finally, repeat the same for shipments:

1
2
3
4
5
6
CREATE STREAM shipments WITH (
    kafka_topic = 'my-replica-set.logistics.shipments',
    value_format = 'avro',
    timestamp = 'ts',
    timestamp_format = 'yyyy-MM-dd''T''HH:mm:ss'
);

Join the streams together

The goal is to create a unified view of the activity of shipped orders. To do this, we want to include as much customer information on each shipment as possible. Recall that the orders collection that we created in MongoDB only had an identifier for each customer, but not their name. Use this identifier to look up the rest of the information by using a stream/table join. To do this, you must re-key the stream into a table by the id field:

1
2
3
4
5
6
7
CREATE TABLE customers_by_key AS
    SELECT id,
           latest_by_offset(name) AS name,
           latest_by_offset(age) AS age
    FROM customers
    GROUP BY id
    EMIT CHANGES;

Now you can enrich the orders with more customer information. The following stream/table join creates a new stream that lifts the customer information into the order event:

 1
 2
 3
 4
 5
 6
 7
 8
 9
10
11
CREATE STREAM enriched_orders AS
    SELECT o.order_id,
           o.price,
           o.currency,
           c.id AS customer_id,
           c.name AS customer_name,
           c.age AS customer_age
    FROM orders AS o
    LEFT JOIN customers_by_key c
    ON o.customer_id = c.id
    EMIT CHANGES;

You can take this further by enriching all shipments with more information about the order and customer. Use a stream/stream join to find orders in the relevant window of time. This creates a new stream called shipped_orders that unifies the shipment, order, and customer information:

 1
 2
 3
 4
 5
 6
 7
 8
 9
10
11
12
13
14
15
16
CREATE STREAM shipped_orders WITH (
    kafka_topic = 'shipped_orders'
)   AS
    SELECT o.order_id,
           s.shipment_id,
           o.customer_id,
           o.customer_name,
           o.customer_age,
           s.origin,
           o.price,
           o.currency
    FROM enriched_orders AS o
    INNER JOIN shipments s
    WITHIN 7 DAYS
    ON s.order_id = o.order_id
    EMIT CHANGES;

Start the Elasticsearch sink connector

The application must perform searches and analytics over this unified stream of information. To make this easy, spill the information out to Elasticsearch and run the following connector to sink the topic:

1
2
3
4
5
6
CREATE SINK CONNECTOR enriched_writer WITH (
    'connector.class' = 'io.confluent.connect.elasticsearch.ElasticsearchSinkConnector',
    'connection.url' = 'http://elastic:9200',
    'type.name' = 'kafka-connect',
    'topics' = 'shipped_orders'
);

Check that the data arrived in the index by running the following command from your host:

1
curl http://localhost:9200/shipped_orders/_search?pretty

Your output should resemble:

 1
 2
 3
 4
 5
 6
 7
 8
 9
10
11
12
13
14
15
16
17
18
19
20
21
22
23
24
25
26
27
28
29
30
31
32
33
34
35
36
37
38
39
40
41
42
43
44
45
46
47
48
49
50
51
52
53
54
55
56
57
58
59
60
61
62
63
64
65
66
67
68
69
70
71
72
73
74
75
76
77
78
79
80
81
82
83
84
85
86
87
88
89
90
91
92
93
94
95
96
97
98
99
{
  "took" : 75,
  "timed_out" : false,
  "_shards" : {
    "total" : 1,
    "successful" : 1,
    "skipped" : 0,
    "failed" : 0
  },
  "hits" : {
    "total" : {
      "value" : 5,
      "relation" : "eq"
    },
    "max_score" : 1.0,
    "hits" : [
      {
        "_index" : "shipped_orders",
        "_type" : "kafka-connect",
        "_id" : "22",
        "_score" : 1.0,
        "_source" : {
          "O_ORDER_ID" : "22",
          "SHIPMENT_ID" : "71",
          "CUSTOMER_ID" : "7",
          "CUSTOMER_NAME" : "sue",
          "CUSTOMER_AGE" : 25,
          "ORIGIN" : "iowa",
          "PRICE" : 29.71,
          "CURRENCY" : "aud"
        }
      },
      {
        "_index" : "shipped_orders",
        "_type" : "kafka-connect",
        "_id" : "17",
        "_score" : 1.0,
        "_source" : {
          "O_ORDER_ID" : "17",
          "SHIPMENT_ID" : "75",
          "CUSTOMER_ID" : "5",
          "CUSTOMER_NAME" : "fred",
          "CUSTOMER_AGE" : 34,
          "ORIGIN" : "texas",
          "PRICE" : 25.25,
          "CURRENCY" : "eur"
        }
      },
      {
        "_index" : "shipped_orders",
        "_type" : "kafka-connect",
        "_id" : "29",
        "_score" : 1.0,
        "_source" : {
          "O_ORDER_ID" : "29",
          "SHIPMENT_ID" : "89",
          "CUSTOMER_ID" : "7",
          "CUSTOMER_NAME" : "sue",
          "CUSTOMER_AGE" : 25,
          "ORIGIN" : "california",
          "PRICE" : 15.0,
          "CURRENCY" : "aud"
        }
      },
      {
        "_index" : "shipped_orders",
        "_type" : "kafka-connect",
        "_id" : "13",
        "_score" : 1.0,
        "_source" : {
          "O_ORDER_ID" : "13",
          "SHIPMENT_ID" : "92",
          "CUSTOMER_ID" : "2",
          "CUSTOMER_NAME" : "bill",
          "CUSTOMER_AGE" : 51,
          "ORIGIN" : "maine",
          "PRICE" : 50.5,
          "CURRENCY" : "usd"
        }
      },
      {
        "_index" : "shipped_orders",
        "_type" : "kafka-connect",
        "_id" : "15",
        "_score" : 1.0,
        "_source" : {
          "O_ORDER_ID" : "15",
          "SHIPMENT_ID" : "95",
          "CUSTOMER_ID" : "5",
          "CUSTOMER_NAME" : "fred",
          "CUSTOMER_AGE" : 34,
          "ORIGIN" : "florida",
          "PRICE" : 13.75,
          "CURRENCY" : "usd"
        }
      }
    ]
  }
}

Try inserting more rows into Postgres and each MongoDB collection. Notice how the results update quickly in the Elasticsearch index.

Tear down the stack

When you're done, tear down the stack by running:

1
docker-compose down

Next steps

Want to learn more? Try another use case tutorial:


Last update: 2022-02-07