Materialized cache
What is it?
A materialized view, sometimes called a "materialized cache", is an approach to precomputing the results of a query and storing them for fast read access. In contrast with a regular database query, which does all of its work at read-time, a materialized view does nearly all of its work at write-time. This is why materialized views can offer highly performant reads.
A standard way of building a materialized cache is to capture the changelog of a database and process it as a stream of events. This enables creating multiple distributed materializations that best suit each application's query patterns.
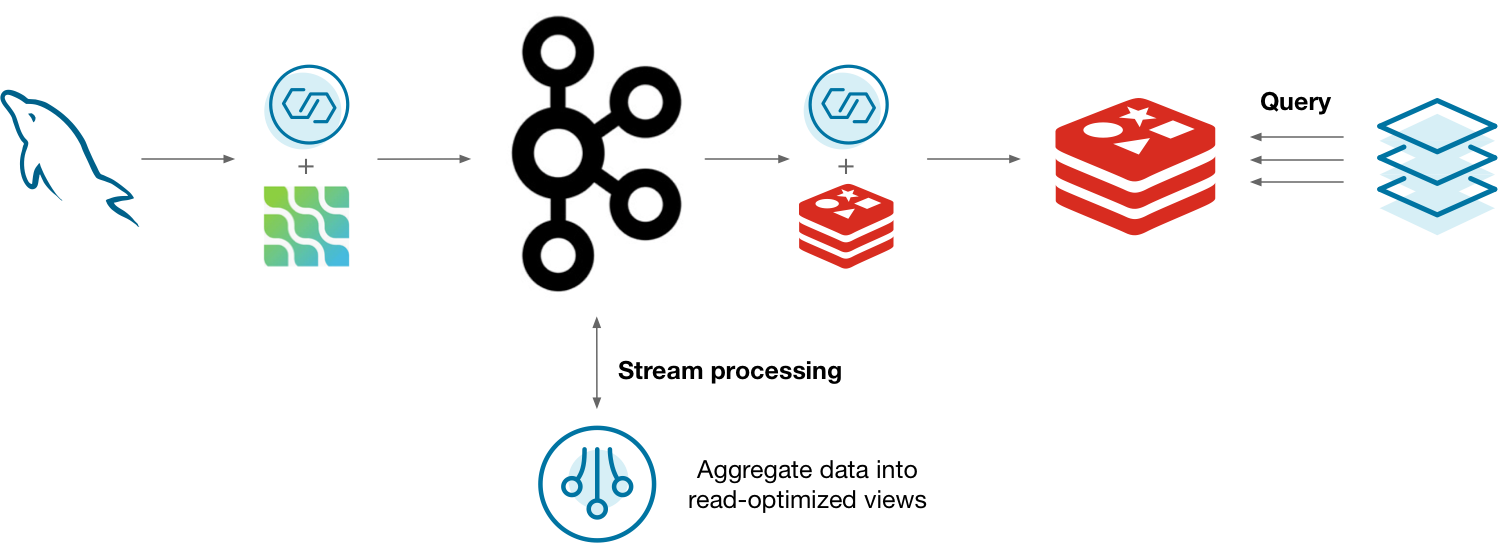
One way you might do this is to capture the changelog of MySQL using the Debezium Kafka connector. The changelog is stored in Kafka and processed by a stream processor. As the materialization updates, it's updated in Redis so that applications can query the materializations. This can work, but is there a better way?
Why ksqlDB?
Running all of the above systems is a lot to manage. In addition to your database, you end up managing clusters for Kafka, connectors, the stream processor, and another data store. It's challenging to monitor, secure, and scale all of these systems as one. ksqlDB helps to consolidate this complexity by slimming the architecture down to two things: storage (Kafka) and compute (ksqlDB).
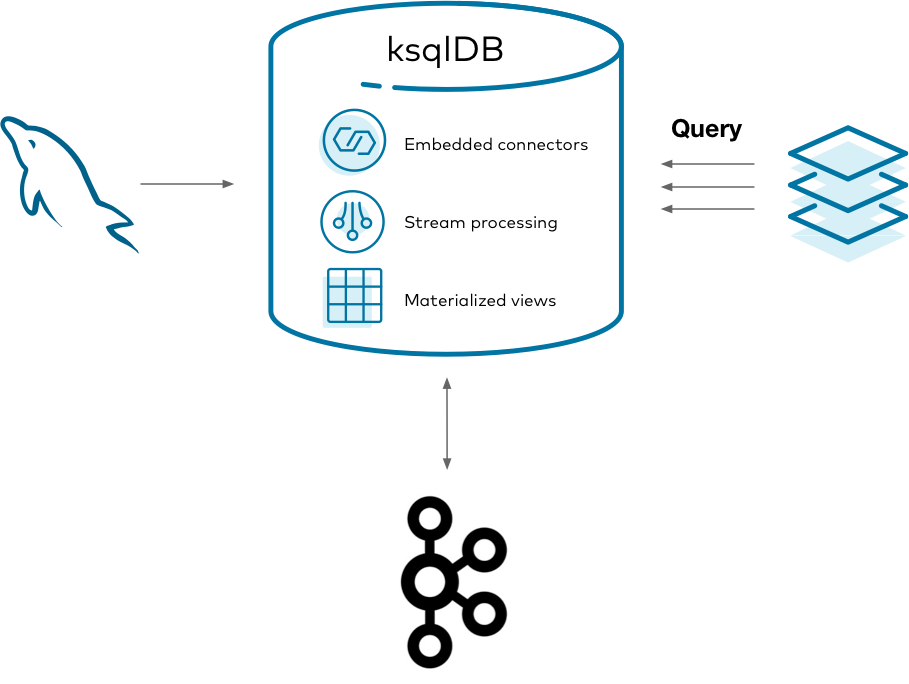
Using ksqlDB, you can run any Kafka Connect connector by embedding it in ksqlDB's servers. You can also directly query ksqlDB's tables of state, eliminating the need to sink your data to another data store. This gives you one mental model, in SQL, for managing your materialized views end-to-end.
Implement it
Imagine that you work at a company with a call center. People frequently call in about purchasing a product, to ask for a refund, and other things. Because the volume of calls is rather high, it isn't practical to run queries over the database storing all the calls every time someone calls in.
This tutorial shows how to create and query a set of materialized views about phone calls made to the call center. It demonstrates capturing changes from a MySQL database, forwarding them into Kafka, creating materialized views with ksqlDB, and querying them from your applications.
Get the Debezium connector
To get started, download the Debezium connector to a fresh directory. The easiest way to do this is by using confluent-hub.
Create a directory for your components:
1 | |
And run:
1 | |
After running this, confluent-hub-components should have some jar files in it.
Start the stack
To set up and launch the services in the stack, a few files need to be created first.
MySQL requires some custom configuration to play well with Debezium, so take care of this first. Debezium has dedicated documentation if you're interested, but this guide covers just the essentials. Create a new file at mysql/custom-config.cnf with the following content:
1 2 3 4 5 6 7 8 | |
This sets up MySQL's transaction log so that Debezium can watch for changes as they occur.
With this file in place, create a docker-compose.yml file that defines the services to launch:
1 2 3 4 5 6 7 8 9 10 11 12 13 14 15 16 17 18 19 20 21 22 23 24 25 26 27 28 29 30 31 32 33 34 35 36 37 38 39 40 41 42 43 44 45 46 47 48 49 50 51 52 53 54 55 56 57 58 59 60 61 62 63 64 65 66 67 68 69 70 71 72 73 74 75 76 77 78 79 80 81 82 83 84 85 86 87 88 89 90 91 92 93 94 95 96 97 98 | |
There are a few things to notice here. The MySQL image mounts the custom configuration file that you wrote. MySQL merges these configuration settings into its system-wide configuration. The environment variables you gave it also set up a blank database called call-center along with a user named example-user that can access it.
Also note that the ksqlDB server image mounts the confluent-hub-components directory, too. The jar files that you downloaded need to be on the classpath of ksqlDB when the server starts up.
Bring up the entire stack by running:
1 | |
Configure MySQL for Debezium
MySQL requires just a bit more modification before it can work with Debezium. Debezium needs to connect to MySQL as a user that has a specific set of privileges to replicate its changelog. You already set up the example-user by default in the Docker Compose file. Now you just need to give it the right privileges. You can do this by logging in to the MySQL container:
1 | |
And then logging into MySQL as root:
1 | |
The root password, as specified in the Docker Compose file, is mysql-pw.
For simplicity, this tutorial grants all privileges to example-user connecting from any host. In the real world, you'd want to manage your permissions much more tightly.
Grant the privileges for replication by executing the following statement at the MySQL prompt:
1 2 3 | |
Create the calls table in MySQL
Seed your blank database with some initial state. In the same MySQL CLI, switch into the call-center database:
1 | |
Create a table that represents phone calls that were made. Keep this table simple: the columns represent the name of the person calling, the reason that they called, and the duration in seconds of the call.
1 | |
And now add some initial data. You'll add more later, but this will suffice for now:
1 2 3 4 5 6 7 8 9 10 | |
Start the Debezium connector
With MySQL ready to go, connect to ksqlDB's server using its interactive CLI. Run the following command from your host:
1 | |
Before you issue more commands, tell ksqlDB to start all queries from earliest point in each topic:
1 | |
Now you can connect to Debezium to stream MySQL's changelog into Kafka. Invoke the following command in ksqlDB, which creates a Debezium source connector and writes all of its changes to Kafka topics:
1 2 3 4 5 6 7 8 9 10 11 12 13 14 15 | |
After a few seconds, it should create a topic named call-center-db.call-center.calls. Confirm that by running:
1 | |
Print the raw topic contents to make sure it captured the initial rows that you seeded the calls table with:
1 | |
If nothing prints out, the connector probably failed to launch. You can check ksqlDB's logs with:
1 | |
You can also show the status of the connector in the ksqlDB CLI with:
1 | |
Create the ksqlDB calls stream
For ksqlDB to be able to use the topic that Debezium created, you must declare a stream over it. Because you configured Kafka Connect with Schema Registry, you don't need to declare the schema of the data for the streams. It is simply inferred from the schema that Debezium writes with. Run the following at the ksqlDB CLI:
1 2 3 4 | |
Create the materialized views
A common situation in call centers is the need to know what the current caller has called about in the past. Create a simple materialized view that keeps track of the distinct number of reasons that a user called for, and what the last reason was that they called for, too. This gives you an idea of how many kinds of inquiries the caller has raised and also gives you context based on the last time they called.
You do this by declaring a table called support_view. Keeping track of the distinct number of reasons a caller raised is as simple as grouping by the user name, then aggregating with count_distinct over the reason value. Similarly, you can retain the last reason the person called for with the latest_by_offset aggregation.
Notice that Debezium writes events to the topic in the form of a map with "before" and "after" keys to make it clear what changed in each operation. That is why each column uses arrow syntax to drill into the nested after key.
In the ksqlDB CLI, run the following statement:
1 2 3 4 5 6 7 | |
You have your first materialized view in place. Now create one more.
It's useful to have an idea of the lifetime behavior of each caller. Rather than issuing a query over all the data every time there is a question about a caller, a materialized view makes it easy to update the answer incrementally as new information arrives over time. The following materialized view counts the total number of times each person has called and computes the total number of minutes spent on the phone with this person.
1 2 3 4 5 6 7 | |
Query the materialized views
Now you can query our materialized views to look up the values for keys with low latency. How many reasons has Derek called for, and what was the last thing he called about? In the ksqlDB CLI, run the following statement:
1 2 3 | |
Your output should resemble:
1 2 3 4 | |
How many times has Michael called us, and how many minutes has he spent on the line?
1 2 3 | |
Your output should resemble:
1 2 3 4 | |
Try inserting more rows into the MySQL prompt. Query ksqlDB and watch the results propagate in real-time.
Tear down the stack
When you're done, tear down the stack by running:
1 | |
Running this in production
In practice, you won't want to query your materialized views from the ksqlDB prompt. It's much more useful to query them from within your applications. To do that, you can use the Java client for ksqlDB or submit queries to ksqlDB's servers through its REST API.
Next steps
Want to learn more? Try another use case tutorial: